David asked: “What can you tell me about treating those rusty-brown areas and white spots (fluorosis cases) with Icon or M.I. Paste? Is it better to whiten?”
Thanks for the question, David. You’re probably going to regret that you asked me this question because you’re going to feel like you’re back in school. But to answer effectively, I need to go into some enamel histology. Hopefully, you’ll be patient, because I think it will make a lot of sense by the time you’ve read through this.
Enamel Prisms:
- Extend from the DEJ to the enamel surface (well, actually, this is technically not true – I’ll explain later).
- Have a central core and an outer periphery, with a small non-mineralized space between the two (intraprismatic space).
- The core and periphery are both made of thousands of hydroxyapatite crystallites. These individual crystallites are long and thin. And they may be oriented parallel to the prisms or perpendicular to the prisms.
Type 1 enamel (most common):
- Crystallites of the core are parallel to the enamel prism.
- Crystallites of the periphery are perpendicular to the enamel prism.
Type 2 enamel:
- Crystallites of the core are perpendicular to the enamel prism.
- Crystallites of the periphery are parallel to the enamel prism.
When acid etchant is applied to enamel, hydroxyapatite crystallites will dissolve at the ends of these long, thin crystallites. The lateral sides of the crystallites are more resistant to the acid etch (because of a higher concentration of carbonate ions).
The point is that when crystallites are arranged parallel to the enamel prism, the ends of the crystallites are pointed at the surface and exposed to the etchant. But when the crystallites are perpendicular to the prism, it is the sides of the crystallites that the etchant touches, so they do not dissolve much.
The result is that depending on if the enamel is type 1 or type 2, either the core OR periphery will dissolve away, but not both of them. This results in a microscopic etch pattern that will allow resin to flow into the area of crystallites that was dissolved away, permitting a firm microscopic “grip” to the enamel by the resin.
But now let me throw a wrench into the entire concept. All dental professionals understand that the mouth goes through pH cycling each day, where the pH goes up and down. At times the pH results in some enamel demineralization, followed by periods of enamel remineralization.
The ameloblasts that create the enamel prisms during tooth development do this in a very orderly way, resulting in prisms and the specific orientation of the hydroxyapatite crystallites that I discussed. That does not happen during demineralization and remineralization process on the surface of the teeth.
Remineralized surface enamel is comprised of a very aprismatic/amorphous layer of randomly deposited hydroxyapatite crystallites. This layer is sometimes referred to as the “enamel skin.” The bottom line is that, not only is the amorphous surface layer of enamel more problematic in etching and achieving a retentive etch pattern, but it is far denser than type 1 & 2 enamel.
Remember that type 1 & 2 enamel has intraprismatic space (space between the central core and periphery) and interprismatic space (space between the individual prisms). But surface enamel has none of these spaces. It is, therefore, much denser than the enamel below the surface.
This means that it is far more challenging to etch away the amorphous layer of enamel because most of the crystallites are laying sideways on the surface of enamel, and the sides of the crystallites are more resistant to the acid. But even when we do etch this enamel skin, it does not result in a retentive “pattern” (like types 1 & 2 enamel do) that is conducive to a strong bond of resin.
This is precisely why we typically create a bevel of the enamel at the perimeter of many types of bonded restorations. By beveling, this exposes the type 1 and/or type 2 enamel under the enamel skin, where we can get a retentive etch pattern.
So why did I need to explain all of this histology? You need to genuinely understand the above histology (especially the amorphous surface layer of enamel) and how it affects the use of whitening, Icon and MI Paste.
Individual enamel crystallites are quite porous; however, the porosity of the crystallites is extremely small and microscopic – infinitely smaller than intra and interprismatic spaces. So Icon and MI Paste can’t get through the dense surface layer of enamel. But bleaching factors (perhydroxyl radicals, etc.) are so aggressive, and the ions/radicals are so small that these radicals can easily and rapidly go through even the more dense surface enamel.
Let me take various parts of your fluorosis question separately:
- “rusty-brown areas” – these are areas of enamel that are so poorly formed (due to fluorosis/disruption of ameloblasts during tooth formation) that they absorbed stain shortly after the tooth’s eruption into the mouth. The brown is nothing more than discolored organic debris that has soaked into and is trapped inside, those highly porous areas of enamel.
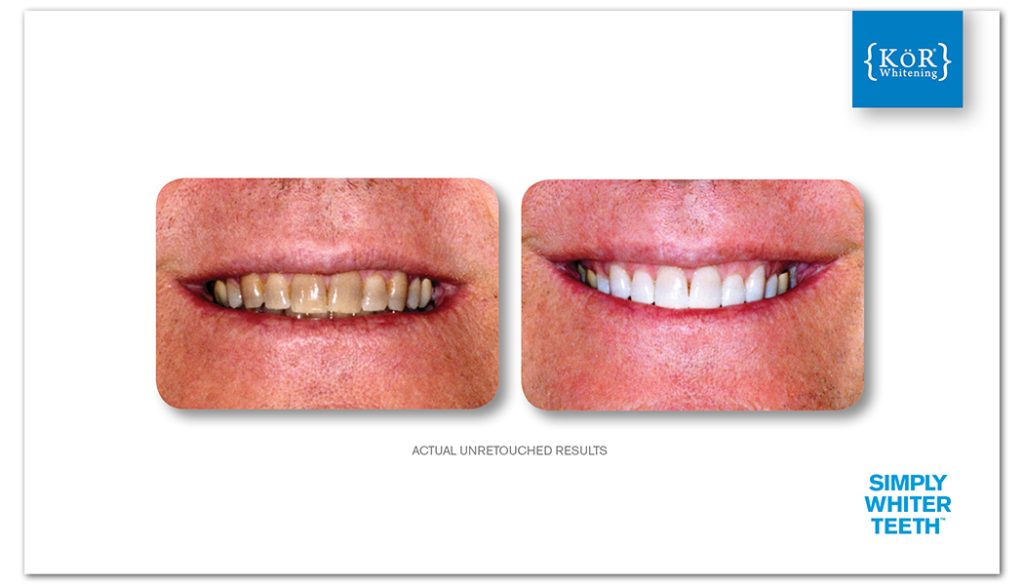
Icon and MI Paste can’t help those brown areas. KöR® Whitening can. It is the “oxygenation” phase of whitening that you’ve heard me talk about that removes this brown debris. The bleaching factor radicals are so aggressive that I often refer to them as “scrubbing bubbles.” These radicals break up the long-chain stain molecules into ultra-small particles, and the aggressiveness of the radicals (scrubbing bubbles) pushes these ultra-small particles right through the surface layer of enamel – thereby removing the built-up stain inside the enamel, under the surface layer.
The reason that, specifically, KöR® Whitening can do this is because of the 6+ hours of active whitening activity (compared to the average 20-35 minutes) made possible because of the seal created by KöR-Seal Whitening Trays. So this oxygenation (scrubbing bubbles) goes on for 6+ uninterrupted hours during sleep every night. And there are other factors regarding the KöR® gels that allow it to penetrate enamel faster (no time to go deeper into that).
- Whitening should always be first for several reasons.
- You’ve already read above about the brown stains.
- Once you’ve used Icon, the infiltrated resin within the enamel will block future whitening. Certainly, we know that bleaching factors can and do enter enamel and move laterally. So theoretically, you should be able to whiten under any infiltrated resin. But in a practical sense, we’re dealing with “diminished returns.” In other words, whitening is simply not as effective when you have deeply infiltrated unfilled resins. So you should be whitening first.
- Icon vs. MI Paste
Both of these treatments are very hit and miss, depending on your technique. Good technique = good results. Bad technique = ??
Remember that neither Icon nor MI Paste can get through that high-density surface enamel. So you need to remove that amorphous surfacelayer first. But how much do you have to remove? That’s the rub. The thickness of the enamel skin is extremely variable.
You may use numerous methods to remove the surface layer to expose the demineralized white spots (and now that the brown is gone after whitening, those same areas are now white spots). Enamel microabrasion, abrasive discs, fluted finishing burs, etch, etc. Many use combinations of these techniques.
But how do you know when you’ve removed enough of the surface? The Icon instructions give you a step-by-step technique to hopefully determine when you’ve removed enough. But not so with MI Paste.
I hear very good things about Icon, but I personally have some reservations (notice I did not say “contraindications”). Science tells us that all unfilled resins darken/discolor with time. The process is irreversible. Whitening and even maintenance of whitening will be more difficult/less effective. So for me, I like the idea of using MI Paste after whitening to hopefully alleviate the appearance of white spots by causing mineralization of hydroxyapatite inside those porous areas of enamel.
Obviously, you need to consider the practicality and cost issues of these treatments. But in a perfect world, my suggestion would be the following steps in the following order:
-
- KöR® Whitening. I invented KöR® Whitening, and I own the company. Still, the reason I specifically recommend KöR® here is the ability KöR® has to intensely cleanse the internal tooth structure, including all of the porosities that resulted in brown and white spots.Once you’ve finished KöR® whitening, the internal enamel is exceptionally cleansed of internal debris. This is the perfect condition to use MI Paste and/or Icon.
- MI Paste. MI Paste is very technique sensitive. How do you know when you’ve removed enough of the surface enamel? But the result when you are successful is what you’d want to provide for your own kids, right?
- Icon. If MI Paste is unsuccessful in any specific areas of the teeth, THEN you can use Icon as your ace in the hole.
I hope I didn’t bore you to death with all of the science, and mostly I hope that this gives you the “doctor information” you need to treat your patients ideally.
Very best regards,

Dr. Rod Kurthy
Related Posts